 Go to GitHub
Installation
Unity
Since chARpack is developed using the game engine Unity, we first need to install it. Go to the download page of Unity and download Unity Hub on your computer. Unity Hub is a management tool that will help you download and install different versions of Unity. Once the download is complete, run the installer and follow the on-screen instructions to install Unity Hub. Here we need to install the correct version of Unity which is 6000.0.38f1. You can also download the newest version of Unity and update the project, but this is not recommended. Download and install version 6000.0.38f1 of Unity. Make sure that you add the modules Universal Windows Platform Build and Windows Build Support (IL2CPP) to be able to deploy chARpack on the HoloLens2. To be able to run builds for Android devices like the Meta Quest series, add Android Build Support and the connected modules.
Unity also installs Visual Studio (VS) 2022 Community Edition by default. If you want to develop Unity apps, you’ll need to add the package Game development with Unity. To be able to deploy chARpack on the HoloLens2 also install the VS module Universal Windows Platform development*.
* In recent versions of Visual Studio, this module has been replaced by the WinUI Application Development workload, which, among others, contains the necessary Universal Windows Platform tools and a Windows SDK.
For an already installed Visual Studio, you have to add the modules mentioned above via the Visual Studio Installer.
Open the installer by selecting Tools > Get Tools and Features and click on Modify at your preferred version of Visual Studio.
Enable the modules and Modify in the bottom right corner to install them.
Download
In order to be able to contribute to the project and benefit from version control functionalities, you will need to install Git.
To load chARpack into Unity you first need to download chARpack from our GitHub repository.
You click on the green Button code and select Download ZIP (this also works without having Git installed) or you use Git to clone the project to your disk
git clone --recursive --depth=1 https://github.com/KoehnLab/chARpack.gitPrepare the Project
Open Unity Hub and select the Projects tab. Use the dropdown next to the button Open and select Add project from disk. Put in the location to the root folder of your copy of chARpack and confirm the selection. The project should now show in the list of projects.
Before we can start the project, we first need to apply some more steps.
Since chARpack runs on the HoloLens2, we need to add Microsoft’s MRTK tarballs.
MRTK3
Because of their size, MRTK tarballs are not checked into the git repository. Therefore, the used packages have to be reinstalled. Download and run the MixedRealityFeatureTool and select chARpack’s root folder as Project Path. Click Discover Features and activate the following features:
MRTK3 >
MRTK Graphics Tools
MRTK Core Definitions
MRTK Extended Assets
MRTK Input
MRTK Spatial Manipulation
MRTK Standard Assets
MRTK Tools
MRTK UX Components
MRTK UX Components (Non-Canvas)
MRTK UX Core Scripts

Platform Support >
Mixed Reality OpenXR Plugin
All these features should also appear with the tag “Version x.x.x currently installed”; this does not always work for MRTK3 packages. Usually, it should be sufficient to use the newest (non-prerelease) version. If you encounter any errors here, check for the correct package version on GitHub in Packages > manifest.json.
Click Get Features and confirm that step by clicking Import.
OpenBabel and NuGet
In the current version of chARpack, OpenBabel and NuGet should automatically be downloaded and installed if it is not already found on the system.
UWP
Next, go to the menu bar of Unity and click
File > Build ProfilesSelect the option Universal Windows Platform on the left and click on Switch Platform.
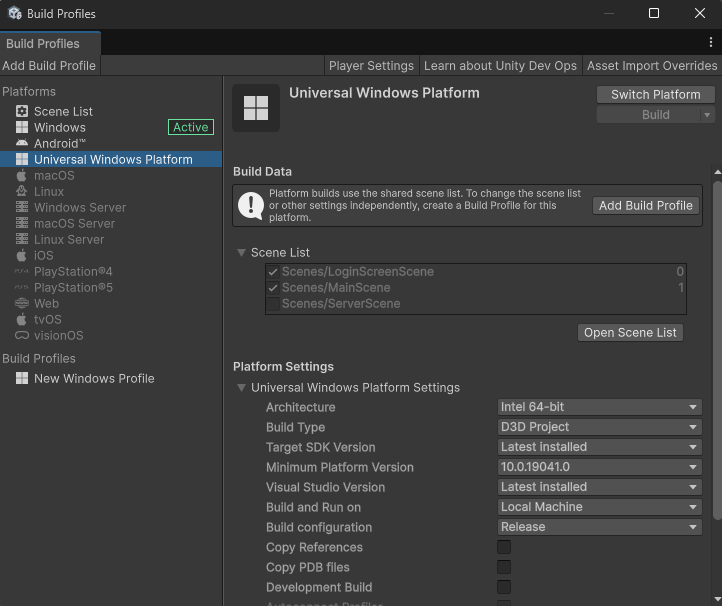
Make sure that, when building for Universal Windows, the LoginScreenScene and the MainScene are checked in the scene list. Conversely, when building the standalone desktop application, make sure only the ServerScene is checked here.
Test Run
Now chARpack should be set up for the first test run. In the Project window of Unity go to
Assets > Scenesand double click LoginScreenScene. Press the play button (top center of the Unity window) for running the test.
Interactions inside Unity editor
Now chARpack is running inside Unity editor.
To interact with the menus you can hold shift to simulate the left hand and space bar to simulate the right hand.
The keys W, A, S and D can be used to move in the scene.
E will move you up and Q will move you down.
Holding right click lets you look around in the scene.
Another important interaction is the mousewheel.
Scrolling with the mouse wheel moves the currently activated hand forward and backward.
Using the mouse wheel makes it easy to press buttons in chARpack.
Alternatively, both buttons and molecules in the scene can be interacted with using mouse clicks.
For instructions on deploying chARpack to your device, see the Deployment section.