 Go to GitHub
Using Unity
General
Unity is a well-known game development engine and provides a basic framework for distribution of chARpack on different devices. The list of features and things you can do using Unity exceeds the scope of this development guide. Therefore, this is only intended as a short introduction. For detailed explanations, see the Unity documentation.
Unity has two basic modes: editor mode and game mode. Editor mode is where you develop, make permanent changes and spend most of your time. Game mode is for testing your implementation and provides a simulation of how chARpack would run in its current configuration.
The Unity editor
The layout of the Unity editor can be confusing at first, so a short overview might be useful:

- Command bar You can find project settings and build options, create game objects, define preferences and much more from this bar.
- Toolbar This bar provides some basic settings for the game and most importantly the Play, Pause and Stop buttons for controlling game mode.
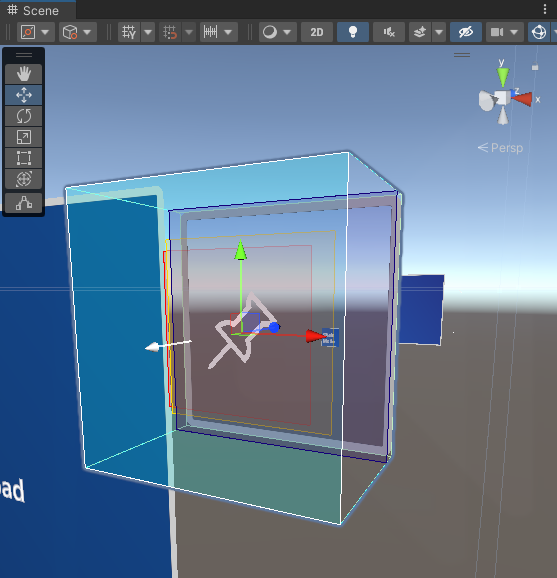
- Scene view You can navigate the current scene in this view. It shows a lot more detail than game mode, e.g. the local coordinate systems of selected objects or box colliders. Box colliders are used to detect when an object “collides” with something else, for example when the player touches it. Also, you can directly change the position, scale and rotation of objects in this view.
- Game view In editor mode, this window does basically nothing, however in game mode, this is where the game runs and you can test user input.
- Hierarchy The hierarchy shows the objects in the current scene, hierarchically ordered by parent-child-relations or the structure (child objects) of the currently selected object.
- Inspector The Inspector allows you to view the properties of any object, prefab, texture etc. This includes Transforms (where the object is located), components (scripts that describe its behavior), child objects and more.
- Console The console gives you important background information: If there are any errors (during compilation or at runtime), they will appear here. If you have decided to log certain actions with messages, they will also be shown here, as well as any warnings triggered by your code or external libraries.
- Project view This gives you an overview over all the files and folders included in the project. Clicking any file will open it in the Inspector so you can view its properties.
Of course you can customize the appearance of the editor to your liking. Simply click and drag the title of a window to relocate it or drag on its borders to resize it. Additionally, you can click the dropdown menu in the far top right labeled Layout and test out some pre-defined layouts.
Scripting
With scripts everything comes to life in your application.
While there are scripts that can provide features on their own, usually scripts are attached to game objects to get used when running the application.
Each created script is initialized as a child of a Unity specific class called MonoBehaviour.
For details on the components of this class see the MonoBehaviour in the official documentation.
Unity uses C# (C Sharp) as a programming language. If you followed the described installation process, Visual Studio 2022 Community Edition should already be installed on your computer, as well as the modules Game development with Unity and Universal Windows Platform development (or Universal Platform Tools from the WinUI Application Development module in Visual Studio 17.10 or later). We recommend using it as your code editor. Double click on a script in the Project view to open it in your editor.
Any script intended to work with Unity needs the line
using UnityEngine;at the top. This is already included by default if you create a new script by right clicking in the project view (in the folder your script should be placed in), then selecting Create > C# Script.
The object a script is attached to can be accessed from within the script under the name gameObject.
Components
The scripts, renderers, colliders, etc. attached to a GameObject (any object in any scene) are referred to as components. You access a method from a specific component of the GameObject you are currently working with:
currentObject.GetComponent<UsefulComponent>().doSomething();However, this only works if the object actually has the component you’re trying to access attached to it.
Prefabs
Prefabs are “prefabricated” objects and you can interpret them as a recipe for making a specific kind of object. Any time you need an object made from this recipe, you Instantiate the prefab.
If you want an instance of a prefab permanently in a scene, you can simply drag it into the Hierarchy of the selected scene. You can then edit it, add or remove components etc. Some changes require “unpacking” the prefab first, which means removing the objects connection to its prefab. Removing this connection means, that changes to the prefab in your Project are not automatically applied to the instance of the prefab in your Scene. Some prefabs already contain custom scripts and methods that will be called on specific events (e.g. a button being clicked). However, remember to only use methods from the scripts that are attached to the prefab itself or add the component in your script first.
Prefabs can be instantiated within scripts:
GameObject myPrefab = (GameObject)Resources.Load("path/to/prefab");
Instantiate(myPrefab);
The Instantiate command also accepts intended position, rotation, and a parent for the prefab instance as optional arguments.