Unity's localization features
General
Unity offers built-in support for multi-language interfaces. For further information and guides, check the official documentation. In this localization section of the development guide we discuss the implementation of localization into chARpack.
Adding locales
The molecular builder currently supports English and German languages, while English is the default locale.
To implement further locale support, go to Edit > Project Settings > Localization and select Locale generator.
Check the boxes next to all locales you wish to add and select Generate Locales.
Locales are saved in Assets/Locales.
Now you need to add translations for the new locale in all string tables and asset tables.
Also, edit the switchLanguage method in Assets/scripts/appSettings.cs since the current implementation only uses two languages.
Changing the default locale
The default locale can be changed in Edit > Project Settings > Localization.
Select the Specific Locale Selector field and enter the locale you want to set as default.
You should also set the project locale to the default locale in the Project Locale Identifier field.
Adding translations
In the current version of chARpack , two string tables contain all translations for the project.
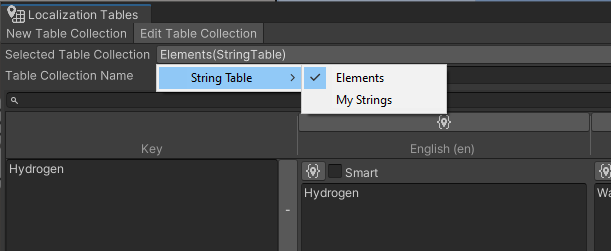
In the localization table editor labels and their translations can be added or existing labels can be edited.
The editor is accessed via Window > Asset Management > Localization Tables.
Under the tab Edit Table Collection you can find the already existing tables.
With the drop-down menu Selected Table Collection you switch between the tables.
Elements contains the names of all atoms that can be instantiated, My Strings contains everything else.

To add content, select Add new entry and enter translations for each locale as well as a unique key. In most cases, e.g. if you are only translating a single word, the simplest way is to use the English word as the key.
Adding tables
The project uses only two tables at the moment, with My Strings storing most of the data.
If you need a new table for a specific purpose, go to Window > Asset Management > Localization Tables and select the New Table Collection tab.
Choose a table type, the options being String Table Collection to localize text and Asset Table collection to localize other things like textures.
After that, give the table a name and select Create.
Localization tables are also saved in Assets/Locales.
You can now access and edit the new table as described above.
For easier access of the new string table from a script, you can create a new helper method like LocalizationManager.Singleton.GetLocalizedString(text) that uses your new table instead of My Strings.
If you are writing this method in a script other than LocalizationManager, you will need to add the lines
using UnityEngine.Localization;
using UnityEngine.Localization.Settings;
to the beginning of your script.