 Go to GitHub
Example dual-language button
Creating the button
First, instantiate an MRTK button.
The project contains many menu prefabs from which you can copy a single button; there is also a prefab called CanvasButtonWithBackground found in Assets/Resources/prefabs.
Alternatively, you can use the search field in the Project section and for example type button in the search field.
Make sure the search is executed in the whole project and not only in Assets.
Choose a type of button and instantiate it, either directly in the Scene/prefab you are working on or via the Instantiate method within a script.
Adding method listeners and icons
Some of the prefabs already have icons that correspond to their purpose.
In case you want a different icon, manually update it.
chARpack’s sprite icons are located in Assets > Resources > Icons > Sprites; you can also use font icons.
Predefined content
The buttons used in chARpack generally follow a default structure where you can find icons and label texts in Frontplate > AnimatedContent within the button.
The Text child game object contains a TextMeshPro - Text (UI) component (accessible as a component of type TextMeshProUGUI from script) which controls the label text.
The Icon child object contains different options; you can either set a font icon or a sprite icon.
Method calls can be assigned to the event lists (usually the OnClicked event) in the PressableButton component.
If adding a method call in the editor, drag the game object with the associated script (that contains the method you want to call) to the object field and choose the method from the dropdown menu next to it.
You can do this in the editor, but for consistency purposes it is preferrable to do so from within a script as described in the next section.
Scripting
To add a method listener after instantiating the button, follow the structure:
buttonGameObject.GetComponent<PressableButton>.onClick.AddListener(delegate { yourMethod(arguments); });This will add the corresponding method listener at runtime (i.e., the method will be called when the button is clicked). For more information see the MRTK3 documentation or look at other examples of buttons in the project.
Adding translations
All items should provide English and German texts and labels. The following two sections guide you though text and label generation process.
Static text
You can enter the English label to the button before using any localization.
In this case, the item’s functionality can be tested without the need to add translations from the beginning.
However, a label can also be added later.
To localize any content within a scene or prefab that will not be generated by a script, go to Window > Asset Management > Localization Scene Controls.
Select English as the active locale and enable the Track Changes toggle.
Now, any changes you make will be tracked as part of the selected locale.
Enter the English text for the item if you haven’t yet.
Content other than text can also be localized, see the documentation of Localization package.
After that, change the active locale to German and enter the corresponding translation.
Tracked changes in text will be marked by a green background.
Translations are saved in a string table (e.g. Assets/Locales/My Strings), which can also be edited separately in Window > Asset Management > Localization Tables.
Alternatively, if you want to choose a key name for your new localized string (by default, Unity uses the path to its GameObject as a key, which can be quite long), you can also follow a similar process as for the scripting approach. Simply right-click on the TextMeshPro or TextMeshProUGUI component you want to localize and select Localize Property in the menu that appears. This will add a GameObjectLocalizer component to your object, which contains all the relevant localization information, such as which text or UI object is tracked by the localization system.
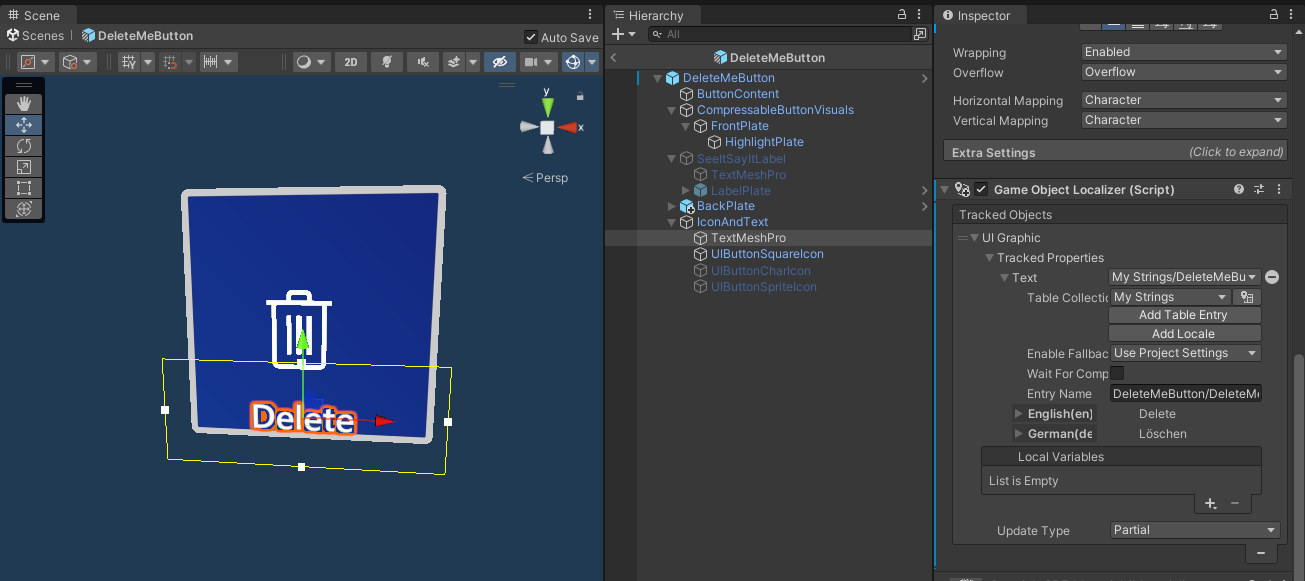
In this component, you can choose which entry from which localization table you would like to use, as well as directly edit its translations.
Here, you can either choose an existing localized string that fits your purposes or create a new one with new translations by selecting My Strings as the Table Collection and then pressing Add Table Entry.
Scripting
Open the My Strings table in Window > Asset Management > Localization Tables and add new entries for any required text and enter both, the English, and the German translations in the corresponding fields.
Assign a unique key for each field.
If you are using only single words without special characters, it is sufficient to use the English version in the key field as well.
In any method within the script, you can now assign the value of LocalizationManager.Singleton.GetLocalizedString(*KEY*) to a string and use it as you would with the English word, for example to set it as the main label of the button using the ButtonConfigHelper component.
Example:
// Helper methods to generate localized tool tip text
private string getToolTipText(string name, double mass, double radius, double bondNum)
{
    string rad = LocalizationManager.Singleton.GetLocalizedString("RADIUS");
    string numBonds = LocalizationManager.Singleton.GetLocalizedString("NUM_BONDS");
    string massStr = LocalizationManager.Singleton.GetLocalizedString("MASS");
    string nameStr = LocalizationManager.Singleton.GetLocalizedString("NAME");
    name = GetLocalizedElementName(name);
    string toolTipText = $"{nameStr}: {name}\n{massStr}: {mass}\n{rad}: {radius}\n{numBonds}: {bondNum}";
    return toolTipText;
}